This guide is generated from docs/user-guide.en.md in the repository.
PNG to SVG Vectorize — user guide
Turn raster illustrations (PNG, WebP, JPEG) into clean, editable SVG files: smooth gradient fills, crisp outlines,
pure <path> shapes that work in browsers, Figma, Illustrator, Inkscape and app frameworks. Everything happens on
your computer — nothing is uploaded, nothing is tracked.
Bahasa Indonesia: user-guide.id.md
1. Install
Download the latest release from the GitHub Releases page.
Windows 10 / 11 (64-bit)
- Download
PNG-to-SVG-Vectorize-Setup-x.y.z.exeand run it. It installs for your user only; no administrator rights are needed. - The app is free and open source and is not code-signed, so Windows SmartScreen may show "Windows protected your PC". Click More info → Run anyway.
- The app needs the Microsoft Edge WebView2 Runtime. It is built into Windows 11 and almost every Windows 10. If the installer says it is missing, install the Evergreen Runtime from https://developer.microsoft.com/microsoft-edge/webview2/.
Prefer no installer? Use PNG-to-SVG-Vectorize-x.y.z-windows-x64-portable.zip: unzip anywhere and run
PNG to SVG Vectorize.exe.
macOS 12 or newer
Download the DMG for your Mac:
…-arm64.dmgfor Apple Silicon (M1 and later),…-x64.dmgfor Intel Macs.Open it and drag PNG to SVG Vectorize into Applications.
The app is not notarized by Apple, so the first launch is blocked. Open System Settings → Privacy & Security, scroll down and click Open Anyway next to the message about PNG to SVG Vectorize, then confirm. (On macOS 14 and older, right-click the app → Open also works.)
If macOS says the app "is damaged and can't be opened", remove the download quarantine flag in Terminal:
xattr -dr com.apple.quarantine "/Applications/PNG to SVG Vectorize.app"
2. Convert images
The first time you open the app, a short guide walks through the four steps. Skip it with Skip (or Esc); open it again any time with Guide at the top. The steps at the top of the window show where you are.
Add photos — drag one or more PNG, WebP or JPEG files anywhere into the window, press Choose photos, or paste a copied picture with
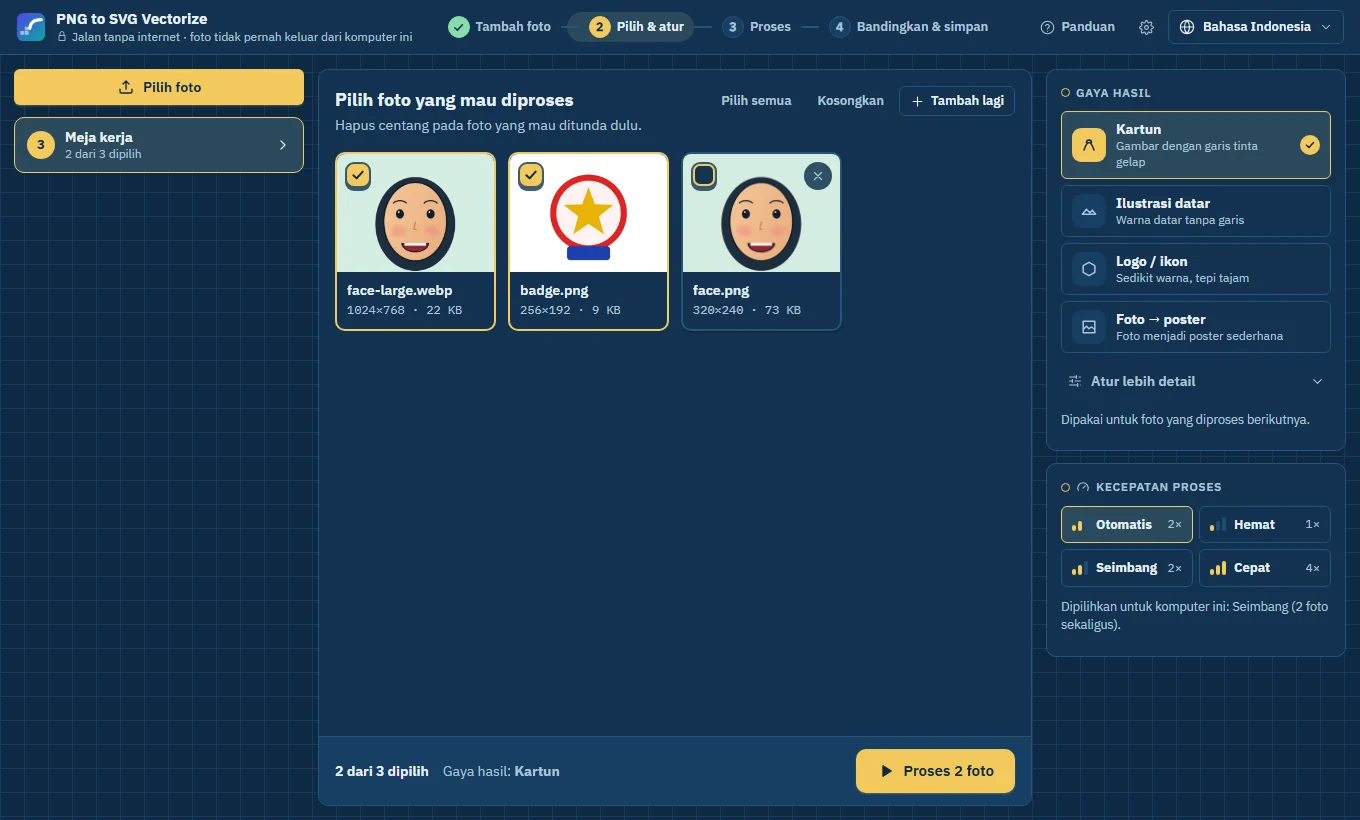
Ctrl+V. Add as many as you like (up to 100 waiting at once): nothing is processed yet. Limits: 50 MB per file, at most 8000 px on the longest side; a photo that cannot be used is explained in a short message.Choose & set up — the photos wait on the workbench. All of them are ticked; untick the ones you want to leave for later (Select all / Clear help with many photos). Pick a result style on the right (section 4). Then press Process N photos.
Process — the photos wait in line and are converted one after another; the list on the left shows each photo's place in line and what is happening (reading the outlines → splitting the colors → smoothing the curves → building the SVG). You can keep working, add more photos, or Stop one photo or Stop all (it asks first; finished results stay). When everything is done a message says how many results are ready.
Compare & save — click a finished photo on the left (sections 3 and 5). Photos you left on the workbench are one click away under Workbench.
Processing speed (right column) decides how many photos are converted at the same time. Converting uses the processor heavily, so the app is careful by default:
| Speed | At the same time | When to use |
|---|---|---|
| Automatic (default) | chosen for this computer: Saver on most laptops, Balanced on computers with 6+ cores and 12 GB+ memory | leave it like this |
| Saver | 1 | older or slower computers, or while you use other programs |
| Balanced | 2 (computers with 4+ cores) | a good middle |
| Fast | up to 4 (one core is always left free) | many photos and nothing else running |
Conversions always run at low priority, so the computer stays responsive. A typical 1536×1024 illustration takes 5–10 seconds. If you close the window while photos are still waiting or being converted, the app asks first.
To remove a result, press its trash icon; you have a few seconds to press Undo.
3. Compare original and SVG
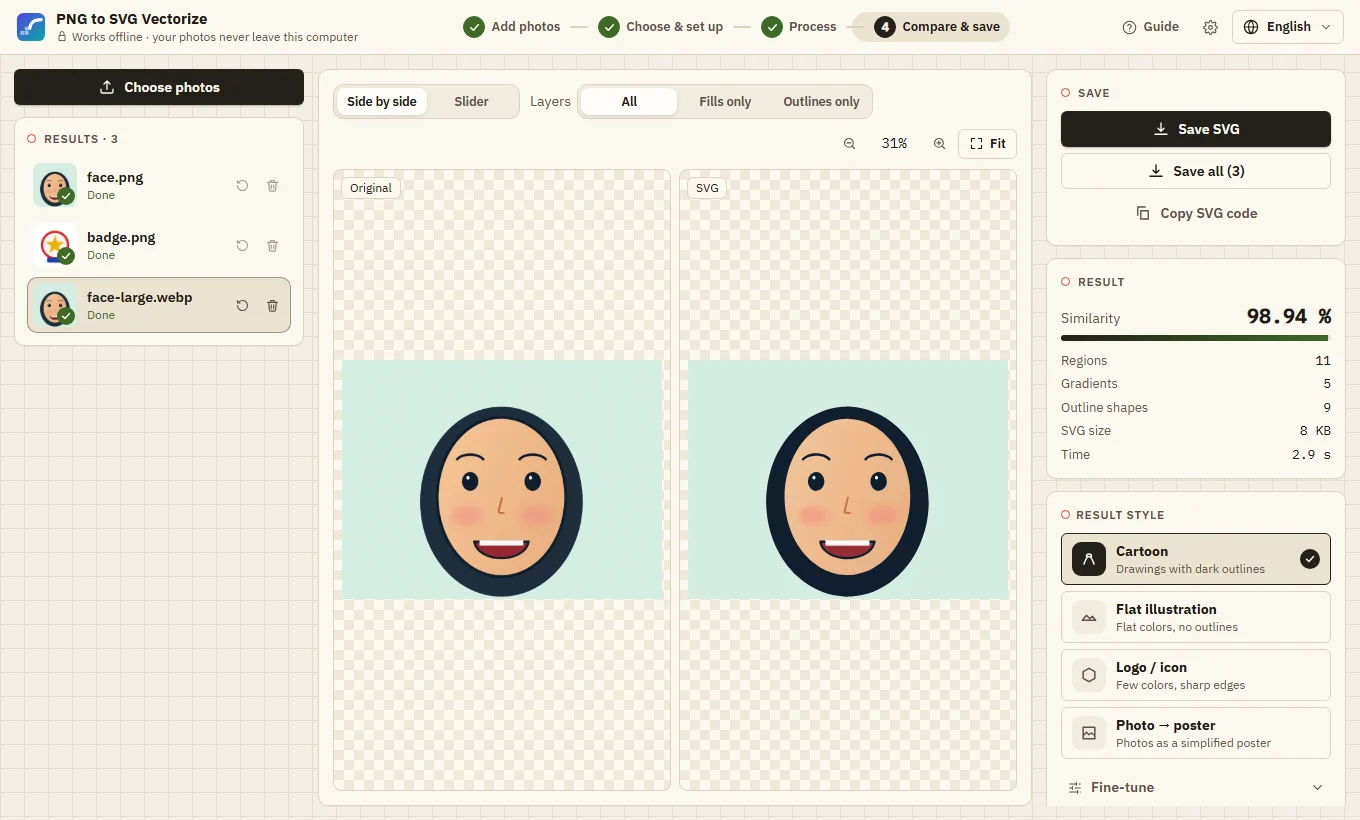
- Side by side: original on the left, SVG on the right. Scroll to zoom (up to 800 %), drag to pan — both sides
move together. Fit (or the
0key) shows the whole image;+/-and arrow keys work too. - Slider: one view with a divider; drag the handle (or use ← →) to wipe between original and SVG.
- Layers: show All, Fills only or Outlines only to check each part of the SVG.
- Result shows the similarity (how close the SVG looks to the original, 100 % = identical; good results are around 98–99 %), the number of regions, gradients and outline shapes, the file size and the time.
Always check details at 200 % or more: one number can hide a small local defect.
4. Settings
Result style — pick the one that matches the pictures before pressing Process (or process again later):
| Style | Use for |
|---|---|
| Cartoon | character art with dark ink outlines and soft shading (default) |
| Flat illustration | solid shapes with few outlines; only clear gradients are kept |
| Logo / icon | logos and icons: flat colors, straight edges and sharp corners, one path per shape, no background; the SVG is trimmed to the artwork (fine-tune: corner rounding, straighten angles, split touching shapes) |
| Photo → poster | photos or paintings turned into a poster-like vector with fewer, larger regions |
| Pixel art | follows the pixel grid exactly: every edge is horizontal or vertical |
Fine-tune (optional; a dot shows when something differs from the style). To apply new settings to a finished photo, select it and press Process again with this style:
| Setting | Effect |
|---|---|
| Separate ink outlines | dark outlines become their own crisp layer |
| Gradient fills / Radial gradients | smooth shading as gradients; off = flat colors |
| Curve tolerance | larger = fewer curve points and smaller files, smaller = closer to the pixels |
| Smoothing | larger = smoother boundaries between colors |
| Merge similar colors (ΔE) | larger = fewer regions (simpler), smaller = more detail |
| Outline detail | resolution used to trace the outlines (auto is usually right) |
| Remove specks smaller than | tiny spots (in pixels) merge into their neighbour |
| Gap filler | thin stroke around each shape that hides hairline gaps when zoomed in (0 = none) |
| Colors | Color, Grayscale or Black & white (with the gray level that splits black from white) |
| Number of colors | Free (with gradients) or 2–32 flat colors, the ink included |
| Palette | after Use these colors on a result: change a color (click it), add one, or remove one — its areas take the nearest color |
| Transparent background | leave the background out: transparent pixels, or else the area that covers most of the picture's border |
| Shapes | Stacked (smallest files), Cut out: every shape has its holes cut out and nothing overlaps (cutting machines, editing), or Center lines: line drawings become one stroke along the middle of each line, no fills (plotters, laser, embroidery; the threshold sets what counts as ink) |
| Layers per color | groups the fills by color (<g id="color-RRGGBB">), so a design tool shows one layer per color |
Style profiles — save the current style and fine-tune choices under a name (+), pick it again from the list,
export it as <name>.pngsvg-profile.json to share with your team, or import one. The command line reads the
same file: png2svg pictures/*.png --profile brand.pngsvg-profile.json.
Photos you process next always use the current settings. Reset to style defaults brings the defaults back.
App settings
Open Settings with the gear at the top (or Ctrl+,). Changes apply at once and are remembered.
| Section | What you can change |
|---|---|
| Appearance | language · theme: Match system (Paper & ink when the computer is light, Lightbox when it is dark), Paper & ink, Lightbox, Blueprint · density · text size (90–130 %) · reduce animation · show the guide again |
| Processing | processing speed · largest photo accepted (3000–8000 px; lower it on computers with little memory) · how many photos may wait on the workbench · AI models (download/remove) and where AI runs |
| Results | style for new photos · save folder and whether to ask each time (desktop app) · file name with {name}, {style}, {date} · coordinate precision (0–3 decimals: fewer = smaller files) · add width and height to the SVG |
| Privacy and data | diagnostic log on/off and its folder (desktop app) |
| About | version, licenses, Check for updates (only when pressed; asks GitHub for the latest version number) |
Enhance with AI (optional)
An AI model can clean and enlarge a photo before it is vectorized, so edges come out smoother. It helps most with small, blurry or JPEG pictures; it makes processing slower (about 3–4×).
- Settings → Processing → AI model: press Download next to Illustrations (recommended, 17 MB; for drawings, cartoons and flat art) or General (5 MB; photos and mixed pictures). The file comes once from this project's GitHub release, is checked, and is kept on your computer — after that it works offline. Remove deletes it.
- In the style panel, Enhance with AI: Off, Automatic (default — pictures smaller than 1000 px or JPEGs; with the Logo style only JPEGs, whose compression blocks it removes; never with Pixel art) or Always. The result panel shows whether AI was used.
- Run AI on: Automatic uses the graphics card when one is supported (DirectML on Windows, Core ML on Apple Silicon Macs) and falls back to the processor; choose Processor only if the graphics card causes trouble.
Not available on Intel Macs. Models: Real-ESRGAN by Xintao Wang et al., BSD-3-Clause.
Edit shapes
Press Edit above the comparison (or E when the picture has focus), then click a shape in the vector: change its
color, use another shape's color (click the button, then the other shape — this merges two colors), or
delete it. Undo / Redo (Ctrl+Z / Ctrl+Shift+Z) step through your edits. Saving and exporting use the
edited result; processing the photo again starts from scratch.
Keyboard shortcuts
Press ? for the full list: Ctrl+O choose photos, Ctrl+V paste, Ctrl+Enter process, Ctrl+S save,
Ctrl+Shift+S save all, Alt+↑/↓ previous/next result, Delete remove the result, +/−/0 zoom and fit.
5. Save
Choose the format first:
| Format | For |
|---|---|
| SVG | the web, Figma, Illustrator, Inkscape, Flutter — editable vector |
| print and documents; vector with real gradients, opens in Illustrator | |
| EPS | print shops and older design tools (PostScript level 3) |
| DXF | CAD, laser cutters and plotters: outlines only, one layer per color |
| PNG | a sharp picture drawn from the vector at 1×, 2×, 4× or 8× the photo size |
- Save saves the selected result in that format (the app asks where, or saves straight into the save folder chosen in Settings).
- Save all saves every finished result into a folder you choose (SVG, PDF, EPS or DXF); existing files are never
overwritten (
name-2.svgis used instead). - Copy SVG code / Copy PNG put the result on the clipboard, ready to paste into code or a design tool.
- Report of all results: CSV or JSON with the file, style, size, time, colors and similarity of every result — useful to check a batch.
Watch folder (desktop app)
Settings → Automation: choose a folder to watch and a folder for the results, pick the format and press
Start watching. Every picture copied into the watched folder from then on is converted with the current style
(and fine-tune choices) and saved in the results folder; it also appears in the queue. The same works without the
app: png2svg watch inbox/ out/ -f pdf --profile brand.pngsvg-profile.json.
Gradient ids are unique per file, so many SVGs can be inlined on one web page.
6. Tips for the best result
- Clean illustrations work best: cartoons, flat art, icons, logos. Photos produce many regions (use Photo → poster).
- Use the largest, sharpest version you have (around 1000–2000 px on the long side). Avoid heavily compressed JPEGs: their noise turns into tiny regions.
- If small details disappear, lower Merge similar colors; if the file is too big, raise Curve tolerance.
7. Privacy
The app starts a small service inside itself that only accepts connections from the same computer
(127.0.0.1) and only with a random key created for each session. Images and results are kept in memory and are
gone when you close the app. There is no telemetry. The app only uses the network when you ask it to: Check for
updates in Settings → About, and Download of an AI model in Settings → Processing.
8. Troubleshooting
| Problem | Fix |
|---|---|
| Windows: blank window or the app closes immediately | Install the WebView2 Runtime (see Install). |
| Windows: antivirus quarantines the app | Unsigned apps built with PyInstaller are sometimes flagged. Restore it and add an exception, or build it yourself from source. |
| macOS: "can't be opened" / "damaged" | See Install, steps 3–4. |
| "Not accepted — 413" | The file is larger than 50 MB or 8000 px; scale it down. |
| "Not accepted — 415" | Not a PNG, WebP or JPEG image (the file content is checked, not the name). |
| AI model download failed | Check the internet connection and press Download again. A file that does not match the published checksum is deleted, never used. |
| Something else went wrong | The app writes a log: Windows %LOCALAPPDATA%\PNG to SVG Vectorize\app.log, macOS ~/Library/Application Support/PNG to SVG Vectorize/app.log. Please attach it to a GitHub issue (it contains no image data). |
9. Command line and Python
The same engine is available without the app (Python 3.11+):
pip install "png-to-svg-vectorize @ git+https://github.com/RidhuanDEV/png-to-svg-vectorize", then
png2svg picture.png. Studio options work there too, e.g. png2svg logo.png -o logo.pdf --max-colors 4 --remove-bg, or --profile brand.pngsvg-profile.json for a style saved in the app (png2svg --help lists them all).
See the README for the browser UI (png2svg serve) and the Python API.